

Kubernetes is like a magic wand for container orchestration, waving away the complexities of deploying, scaling, and managing your containerized applications. But even with Kubernetes, deployment can be a headache. Enter Helm charts, the secret potion that makes deployment fun and easy! In this article, we’ll explore what Helm charts are, how they work, and how to use them to sprinkle some magic on your Kubernetes cluster.
Kubernetes is like a superhero for cloud-native developers, but even the best superheroes have their limitations. So, while it can solve many problems with ease, there are still a few sneaky villains that it can’t take down on its own. Enter the sidekick: Helm Charts! Together, they’ll tackle any deployment challenge that comes their way, and they’ll do it with style.
Kubernetes: The Magic Wand for Container Orchestration (and You Can Wave It Too!)
Kubernetes is the playground where all your containerized applications can play nicely with each other. Think of it as the coolest treehouse in the neighborhood where all the kids want to hang out. It offers an excellent foundation for handling containerized workloads, networking, storage, and other features. Kubernetes is the ultimate cool kid who simplifies the management and scaling of your apps.
The Power of Helm: Managing Kubernetes Applications with Ease
Helm is a Kubernetes package manager that allows you to install, upgrade, and manage applications on your Kubernetes cluster. It’s like a magical trunk from the wizarding world that can carry everything you need for your journey. You can easily package your application, along with all of its dependencies and configurations, into a single, versioned package known as a chart using Helm.
Think of a chart as a recipe for your application deployment. A chart specifies all the necessary resources, such as Kubernetes manifests, service definitions, and configuration files, for deploying an application on a Kubernetes cluster, similar to how a recipe specifies all the ingredients and instructions for cooking a dish. And, just as you can tweak a recipe to adjust the taste and texture of a dish, you can customize a chart to change the settings and behavior of your application.
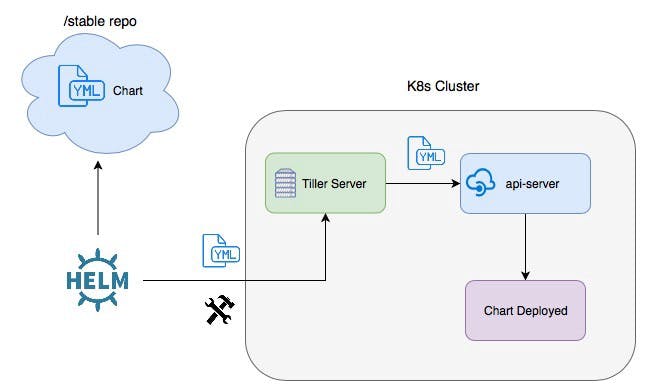
Helm is comprised of two main components: the Helm client and the Helm server. However, before we move on, let’s take a deep breath and stay calm, as there’s more to learn. In the upcoming section, we’ll explore how to set up both the Helm client and server. The Helm client is a command-line interface (CLI) tool that you use to interact with your Kubernetes cluster and manage your charts. It’s similar to Harry Potter’s wand for casting spells, but for managing your Kubernetes resources. The Helm server, on the other hand, is a Kubernetes cluster component that serves as a repository for your charts. It’s like the Hogwarts library, where you can store and share your magical knowledge with others.
You can simplify the deployment of complex applications on Kubernetes and streamline your DevOps workflow by using Helm. Instead of writing and deploying Kubernetes manifests manually for each application, Helm can package and deploy them in a standardized, repeatable manner. It’s like having a team of house-elves to do all the tedious work while you concentrate on your magical projects.
Setting the Stage: Prerequisites for Deploying Helm Charts on Kubernetes
There are a few prerequisites that must be met before you can begin using Helm charts to deploy your applications.
A Kubernetes Cluster
Deciding what security configurations to apply to your installation.
Installing Helm Client and Helm Server.
A Kubernetes Cluster

Before we dive into the world of Helm charts, you must first set up a Kubernetes cluster. Think of it like setting up your own Hogwarts School of Witchcraft and Wizardry, where your applications are the spells and Kubernetes is the wand that performs the magic.
Hold on for a moment, because setting up a Kubernetes cluster can be quite tricky. But don’t fret, you don’t need the skills of a master wizard to do it. You can have your very own cluster up and running in no time with a little practice and some good old-fashioned determination.
Pro Tip: Don’t try to set up your own data center in your backyard. It’s not worth it.
Deciding what security configurations to apply to your installation

Let us now discuss security. You don’t want any dark wizards wreaking havoc in your cluster, do you? Obviously, a big fat NO! So, you must decide which security configurations to apply to your installation.
One important security measure is TLS encryption. Consider it similar to putting up magical barriers around your cluster to keep unwanted visitors out. Encrypting traffic both within and outside of your cluster is critical, especially if you’re using Kubernetes in a production environment.
Role-Based Access Control (RBAC) is another critical security feature. RBAC allows you to manage who has access to your cluster and what they can do with it. It’s similar to assigning different levels of magical power to different Hogwarts students. You don’t want any first-year students accidentally unleashing a forbidden spell, do you?
If you’re running Kubernetes on a cloud platform like AWS, you’ll need to take extra precautions. You can secure your Kubernetes cluster using AWS security features such as Identity and Access Management (IAM).
Remember, security is important, even in the world of magic. So, make sure you take the time to set up the right security configurations for your installation.
Pro Tip: Don’t leave your Kubernetes cluster open to the public. It’s like leaving your car unlocked in a sketchy neighborhood.
Installing Helm Client
Download the latest Helm version for Windows from the official releases page.
Download the appropriate binary file for your operating system.
Extract the downloaded file and move the ‘helm’ binary to a directory in your system’s ‘$PATH’ variable.
Verify the installation by running the command ‘helm version’ in your terminal. If installed correctly, this should output the version of the Helm client and the Kubernetes version it is compatible with.
The download process for macOS is essentially the same.
Installing Helm Server
For Windows:
To install the Helm Server, also known as Tiller, you need to follow these steps:
Create a new service account in your Kubernetes cluster by running the following command:
$ kubectl create serviceaccount tiller --namespace kube-systemCreate a new cluster role binding for the tiller service account:
$ kubectl create clusterrolebinding tiller-cluster-rule --clusterrole=cluster-admin --serviceaccount=kube-system:tillerInitialize Helm with the tiller service account by running the following command:
$ helm init --service-account tillerAfter running these commands, you should have the Helm server (Tiller) installed and running in your Kubernetes cluster.
For macOS
Open the Terminal application on your Mac.
Install Homebrew package manager by running the following command in your Terminal:
/bin/bash -c "$(curl -fsSL https://raw.githubusercontent.com/Homebrew/install/HEAD/install.sh)"Once Homebrew is installed, use it to install Helm by running the following command in your Terminal:
brew install helmVerify the installation by running the following command in your Terminal:
helm versionYou should see the version number of Helm displayed in your Terminal.
Congratulations, you have now installed the Helm server on your macOS machine!
Helm Charts: The Secret Sauce to Make Kubernetes Deployment Fun and Easy!
Helm behaves as a butler for your Kubernetes cluster. It aids in the definition, installation, and upgrade of complex applications and their dependencies. Helm charts are similar to secret recipes used by your butler to prepare the perfect dish for your Kubernetes cluster. They include all of the files required to describe an application's deployment on Kubernetes. This includes Kubernetes manifests, templates, and variables.
Breaking Down the Wizardry: How Helm Charts Streamline Kubernetes Deployment(And Here's How It Works)
Kubernetes deployment got you down? Don't worry, Helm charts are here to save the day!
To use Helm charts, you need to have the Helm client installed on your local machine, as well as a Kubernetes cluster where you want to deploy your application. Helm charts are stored in a repository, which can be either a local or remote repository. Think of it like your pantry, where all your secret ingredients are stored.
To deploy an application using a Helm chart, you can use the 'helm install' command, which will download the chart from the repository, generate the Kubernetes manifests based on the templates and variables in the chart, and install the application on the Kubernetes cluster. You can also use the 'helm upgrade' command to update the application with a new version of the chart.
Take Charge of Deployment with Helm Charts: A Step-by-Step Guide to Creating Your First Chart
Creating a Helm chart is like cooking up a storm in the kitchen. You can use the 'helm create' command to generate a basic chart structure, and then modify the files to suit your needs. The chart files are organized into a directory structure that includes a 'Chart.yaml' file, which contains metadata about the chart, and a 'values.yaml' file, which contains variables that can be used to configure the deployment of the application.
You can modify the templates in the chart to include Kubernetes resources such as deployments, services, and config maps to customize the deployment of your application. The 'requirements.yaml' file can also be used to define chart dependencies.
New to YAML? Check out this Beginner's Guide! (Free Crash Course Link Mentioned Below)
YAML files are an important part of creating and using Helm Charts. They are used to define configuration data, such as the values that should be used to customize a Helm Chart during installation. If you're new to YAML files and want to learn more about how they work, there are many great resources available online.
One great place to start is with this Beginner-friendly Blog Post On YAML Files by Saad Mansuri. The post provides a clear and concise Introduction to YAML, including its syntax, structure, and common use cases. You'll learn how to write your own YAML files, and how to use them to define data structures for your applications.
Whether you're creating your first Helm Chart or simply interested in learning more about YAML files, this blog post is an excellent resource. Check it out and start mastering YAML today!
The Map to Your Next Deployment: Where to Look for Helm Charts?
Helm charts are typically stored in a repository, which can be either public or private. Consider it similar to the cookbook section of your local library, where you can find all the popular charts for various applications. Helm Hub, the official Helm repository, is a good place to start because it contains a wide range of charts for popular applications. Charts can also be found in community repositories or in your own private repository.
Helm Charts: The Endgame for Effortless Kubernetes Deployments
In conclusion, Helm charts provide a powerful way to simplify the deployment of complex applications on Kubernetes. With a little bit of practice, you can easily create, share, and deploy charts to a Kubernetes cluster, making it easier to manage your applications and streamline your deployment processes. We covered the basics of Helm, from what it is and how it works, to creating charts and where to find them. We also discussed the prerequisites for using Helm, including having access to a Kubernetes cluster and deciding what security configurations to apply to your installation.
By using Helm, you can save time and reduce errors in your deployment process. Whether you're deploying an app on a small local cluster or a large-scale cloud-based infrastructure, Helm can help simplify the process and ensure consistency across environments.
So go ahead, give it a try, and see how Helm can make your life easier as a Kubernetes user. With Helm charts, you'll feel like you have your own personal magic wand for deployment!